Tiling window managers (WMs) are highly praised in the Unix community for their lightweight footprint, extreme customization potential, and efficiency. By replacing traditional desktop environments with keyboard-driven window management, developers can achieve a highly optimized workflow.
This guide details the step-by-step configuration of a custom desktop environment based on Pop!_OS and BSPWM (Binary Space Partitioning Window Manager). Grounded in the popular Nordic color palette, this setup combines minimalist aesthetics with powerful utility.
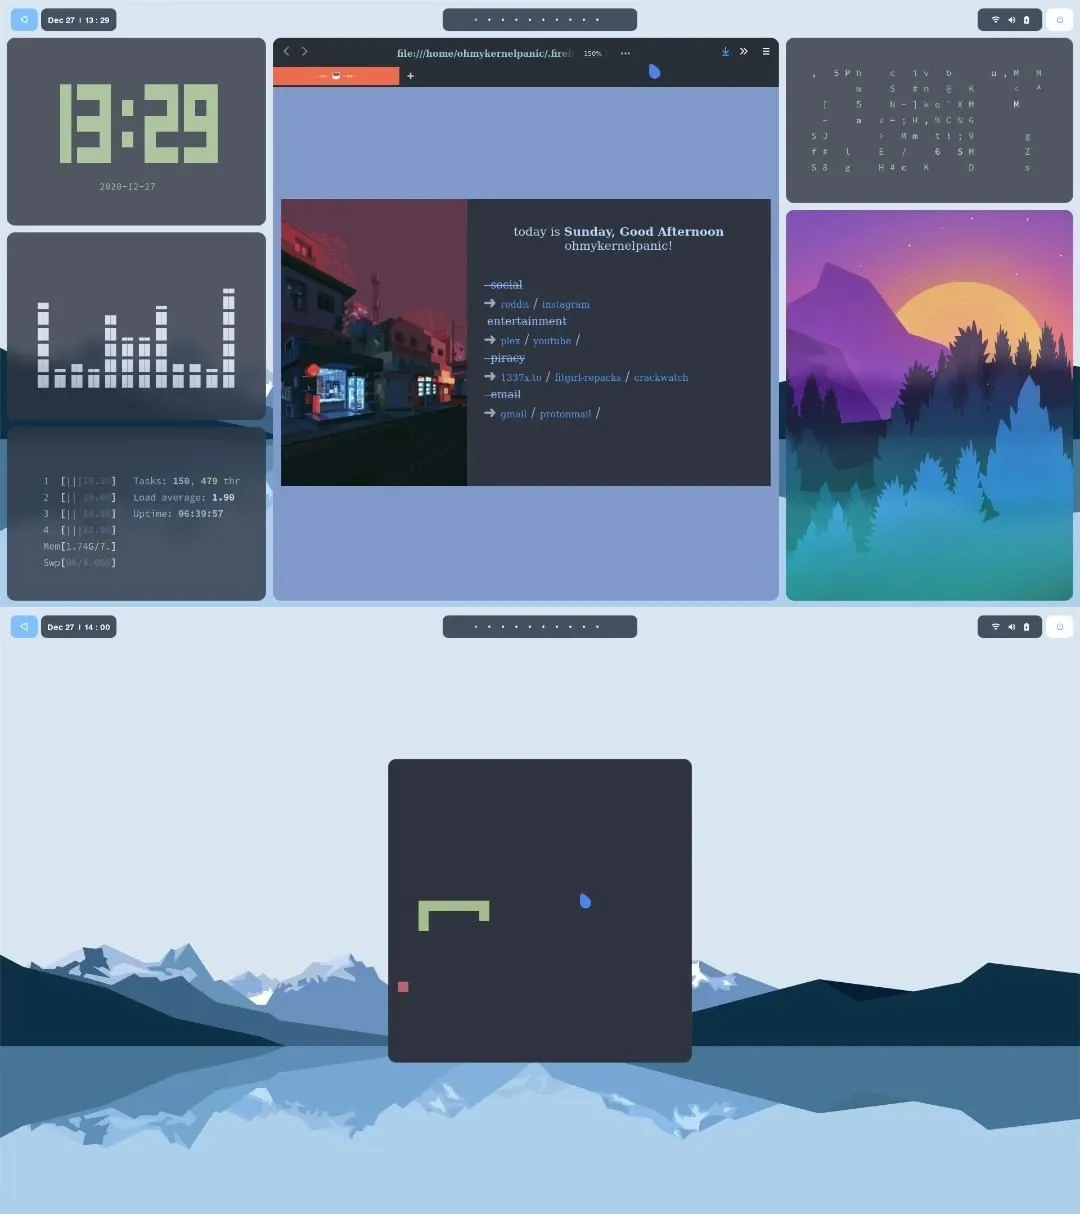
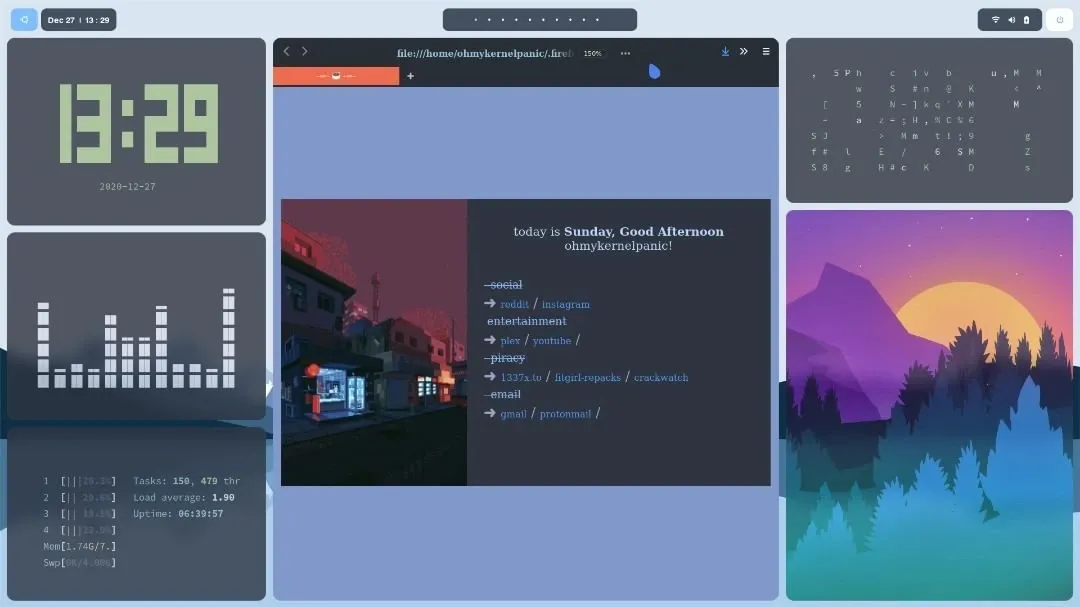
Workspace Showcase
Here is a visual overview of the completed environment running various customized system and terminal utilities:
Core System Architecture
To replicate this environment, we replace the standard GNOME desktop of Pop!_OS with a modular setup of individual utilities. The table below lists the technical specifications of the environment:
| Component | Software / Project | Description |
|---|---|---|
| Operating System | Pop!_OS | Debian/Ubuntu-based stable Linux distribution |
| Window Manager | BSPWM | Binary space partitioning tiling window manager |
| Hotkey Daemon | Sxhkd | Simple X hotkey daemon |
| Status Bar | Polybar | Fast and easy-to-use status bar generator |
| X Compositor | Picom (ibhagwan fork) | Compositor with rounded corners and dual-kawase blur |
| App Launcher | Rofi | A window switcher, application launcher, and dmenu replacement |
| Terminal Emulator | Alacritty | GPU-accelerated terminal emulator |
| Shell & Theme | Zsh + Powerlevel10k | High-performance interactive shell environment |
| Visual Theming | Nordic Dark GTK | Clean dark GTK theme inspired by arctic colors |
| Icons & Cursor | Flattery Dark & Oreo Blue | Flat icons and sleek modern cursor pointers |
| Primary Font | Source Code Pro | Monospaced typeface optimized for coding readability |
Step-by-Step Installation & Compilation
This walkthrough assumes you are starting from a clean installation of Pop!_OS. To ensure absolute control over dependencies and optimal performance, we will compile several core components directly from source.
1. Synchronizing Repositories & System Packages
Before downloading dependencies, ensure your local package database is up-to-date and all base system programs are fully upgraded:
sudo apt update
sudo apt upgrade -y
2. Installing and Configuring BSPWM
BSPWM is a lightweight tiling window manager that represents windows as the leaves of a full binary tree.
Fetching Core Dependencies
Compile and run BSPWM safely by installing the necessary XCB and system libraries:
sudo apt install -y build-essential git vim xcb libxcb-util0-dev libxcb-ewmh-dev libxcb-randr0-dev libxcb-icccm4-dev libxcb-keysyms1-dev libxcb-xinerama0-dev libasound2-dev libxcb-xtest0-dev libxcb-shape0-devCompiling from Source
Clone the official repository, compile the binary, and perform a system-wide installation:
cd ~/Downloads
git clone https://github.com/baskerville/bspwm.git
cd bspwm
make
sudo make install
Initializing Configurations
Establish the configuration directory structure and copy the default initialization script:
mkdir -p ~/.config/bspwm
cp examples/bspwmrc ~/.config/bspwm/
chmod +x ~/.config/bspwm/bspwmrc
cd ..
3. Setting Up the Simple X Hotkey Daemon (sxhkd)
Unlike other tiling window managers, BSPWM does not handle keyboard inputs directly. Instead, it relies on a separate daemon, sxhkd, to bind key presses to commands.
Compiling sxhkd
git clone https://github.com/baskerville/sxhkd.git
cd sxhkd
make
sudo make install
Configuring Keybindings
Create the configuration directory and stage the example hotkey definitions:
mkdir -p ~/.config/sxhkd
cp ../bspwm/examples/sxhkdrc ~/.config/sxhkd/
cd ..
Configuration Note: If you modify
~/.config/sxhkd/sxhkdrc, verify the defined terminal emulator is correct. If you are testing within a standard GNOME shell environment before transitioning, adjust the default terminal command block to invokegnome-terminal.
4. Compiling Polybar for Status Displays
Polybar is a highly modular tool that generates sleek, customizable status bars.
Fetching Build Dependencies
sudo apt install -y cmake cmake-data pkg-config python3-sphinx libcairo2-dev libxcb1-dev libxcb-util0-dev libxcb-randr0-dev libxcb-composite0-dev python3-xcbgen xcb-proto libxcb-image0-dev libxcb-ewmh-dev libxcb-icccm4-dev libxcb-xkb-dev libxcb-xrm-dev libxcb-cursor-dev libasound2-dev libpulse-dev libjsoncpp-dev libmpdclient-dev libcurl4-openssl-dev libnl-genl-3-devCompiling and Installing
git clone --recursive https://github.com/polybar/polybar
cd polybar
mkdir build
cd build
cmake ..
make -j$(nproc)
sudo make install
cd ../..
5. Compiling Picom with Experimental Backends
Standard desktop environments use composite systems to manage windows. For BSPWM, we use a custom fork of Picom (maintained by ibhagwan) which supports smooth dual-kawase blur, active window transparency, and elegant rounded window corners.
Fetching Dependencies
sudo apt install -y meson libxext-dev libxcb1-dev libxcb-damage0-dev libxcb-xfixes0-dev libxcb-shape0-dev libxcb-render-util0-dev libxcb-render0-dev libxcb-randr0-dev libxcb-composite0-dev libxcb-image0-dev libxcb-present-dev libxcb-xinerama0-dev libpixman-1-dev libdbus-1-dev libconfig-dev libgl1-mesa-dev libpcre2-dev libevdev-dev uthash-dev libev-dev libx11-xcb-devGenerating the Binary with Ninja
git clone https://github.com/ibhagwan/picom.git
cd picom
git submodule update --init --recursive
meson --buildtype=release . build
ninja -C build
sudo ninja -C build install
cd ..
6. Core Desktop Components: Rofi & Alacritty
With the core window management architecture installed, we fetch our application menu and main terminal environment:
sudo apt install -y rofi alacrittySetting up Custom Configurations
We pull the pre-configured dotfiles repository to extract our tailored configurations:
git clone https://github.com/lukapiplica/nordic-bspwm-dotfiles
mkdir -p ~/.config/alacritty
cp nordic-bspwm-dotfiles/alacritty/alacritty.yml ~/.config/alacritty/
Hardware Acceleration Tip: If you encounter the error
GLSL 3.30 is not supportedon older graphics cards or virtual environments, force software rasterization by modifying Alacritty's desktop configuration file:sudo nano /usr/share/applications/com.alacritty.Alacritty.desktopReplace the line
Exec=alacrittywithExec=bash -c "LIBGL_ALWAYS_SOFTWARE=1 alacritty".
Interface Polishing & Environment Tuning
Now we configure ZSH, themes, fonts, wallpapers, and lock screens to tie the Nordic workspace aesthetic together.
1. Typography & Font Caching
Inject the primary monospaced codebase typeface to ensure proper rendering of symbols and terminal glyphs:
sudo cp -r ~/Downloads/nordic-bspwm-dotfiles/Source_Code_Pro /usr/share/fonts/
fc-cache -fv
2. Setting wallpapers via Feh
To handle wallpaper placement programmatically upon login, install the feh command-line utility:
sudo apt install feh -y
mkdir -p ~/Wall
cp -r ~/Downloads/nordic-bspwm-dotfiles/Wallpapers/ ~/Wall/
Inject the background startup command into your bspwmrc to run upon window manager initialization:
echo 'feh --bg-fill $HOME/Wall/Wallpapers/wallpaper2.jpeg &' >> ~/.config/bspwm/bspwmrc3. Activating Custom Polybar Themes
Export our customized Polybar setups and copy required TrueType fonts to support status bar icons:
mkdir -p ~/.config/polybar
cp -r ~/Downloads/nordic-bspwm-dotfiles/polybar/* ~/.config/polybar/
echo '~/.config/polybar/./launch.sh &' >> ~/.config/bspwm/bspwmrc
sudo cp ~/.config/polybar/fonts/* /usr/share/fonts/truetype/
fc-cache -fv
4. Interactive Shell Optimization (ZSH & Powerlevel10k)
Switch the default shell shell environment from standard Bash to ZSH, then download the Oh-My-ZSH framework:
sudo apt install zsh -y
sh -c "$(curl -fsSL https://raw.github.com/ohmyzsh/ohmyzsh/master/tools/install.sh)"
Applying the Powerlevel10k Prompt
git clone --depth=1 https://github.com/romkatv/powerlevel10k.git ${ZSH_CUSTOM:-$HOME/.oh-my-zsh/custom}/themes/powerlevel10kModify the environment configuration:
- Open your terminal profile (
nano ~/.zshrc). - Set the active theme line to:
ZSH_THEME="powerlevel10k/powerlevel10k". - Save and close. Run
source ~/.zshrcor typep10k configureto step through the visual setup assistant.
5. Developing in Vim: Integrating Nordic Themes
Port the Nordic color matrix into Vim, and install the aesthetic Vim-Airline status utility:
mkdir -p ~/.vim/colors
cp ~/Downloads/nordic-bspwm-dotfiles/nord.vim ~/.vim/colors/
Clone the Airline extension:
git clone https://github.com/vim-airline/vim-airline.git ~/Downloads/vim-airline
cp -r ~/Downloads/vim-airline/* ~/.vim/
Activate the configuration rules in your editor profile:
echo 'colorscheme nord' >> ~/.vimrc
echo "let g:airline_theme='base16'" >> ~/.vimrc
6. Rofi Application Menu Customization
Copy the Nord theme file and configure it as the primary interface:
mkdir -p ~/.config/rofi/themes
cp ~/Downloads/nordic-bspwm-dotfiles/nord.rasi ~/.config/rofi/themes/
rofi-theme-selector
Theme Activation: Navigate to the
Nord themewithin the selector, press Enter to preview, and apply it globally by typing Alt + a.To bind Rofi as our default application launcher, update your keybindings:
nano ~/.config/sxhkd/sxhkdrcModify the key combination for application spawning from
dmenu_runtorofi -show drun.
Workspace Productivity & CLI Utilities
To build a fully functional development workstation, we install several command-line programs and visual utilities that populate our customized workspaces.
Custom CLI Suite Installation
Install modern visualizers, system hardware monitors, and file managers using standard package repositories:
# Systems monitor (Htop)
sudo apt install htop -y

# Matrix rain screen effect (Cmatrix)
sudo apt install cmatrix -y

# Minimal image viewer (Sxiv)
sudo apt install sxiv -y

# Terminal-based file navigator (Ranger)
sudo apt install ranger -y

# Digital terminal clock (Tty-clock)
sudo apt install tty-clock -y
Advanced Visualizer & System Information Engines
CAVA (Console-based Audio Visualizer)
Compile CAVA to generate bar visualizers based on real-time ALSA/PulseAudio input signals:
sudo add-apt-repository ppa:hsheth2/ppa -y
sudo apt update
sudo apt install cava -y
pfetch (Minimalist System Info Fetcher)
git clone https://github.com/dylanaraps/pfetch.git ~/Downloads/pfetch
sudo install ~/Downloads/pfetch/pfetch /usr/local/bin/
Chafa (Terminal Character Art Engine)
Chafa parses standard images and transforms them into highly detailed terminal-rendered character art:
git clone https://github.com/hpjansson/chafa.git ~/Downloads/chafa
cd ~/Downloads/chafa
./autogen.sh
make
sudo make install
cd ~
Snake (Terminal Recreation of a Classic)
Recreate the classic Nokia snake game using python-pygame libraries:
sudo apt install python3-pip -y
python3 -m pip install -U pygame --user
git clone https://github.com/Unixado/Snake.git ~/Downloads/Snake
Run the game directly from terminal sessions:
python3 ~/Downloads/Snake/src/game.py
Lollypop (Modern Desktop Audio Player)
sudo add-apt-repository ppa:gnumdk/lollypop -y
sudo apt update
sudo apt install lollypop -y
Customizing GTK & Firefox Aesthetics
For an operating system interface to feel unified, both applications and web browsers must share the same color scheme.
1. Desktop Interface Integration via Lxappearance
To load and assign custom widget styles, icon packs, and cursors on lightweight window managers, install LXAppearance:
sudo apt install lxappearance -yOpen lxappearance to select and apply the downloaded Nordic design assets:
- GTK Design Skin: Nordic Dark theme
- Icon Library: Flattery Dark icons
- Mouse Pointer Pack: Oreo Blue cursor
2. Minimalist Browser Theming (Firefox & Minimal Functional Fox)
Download the custom Minimalist userChrome setup to remove standard title bars, center web elements, and match browser borders with the Nordic color palette:
sh -c "$(curl -fsSL https://raw.githubusercontent.com/mut-ex/minimal-functional-fox/master/install.sh)"
cp -r ~/Downloads/nordic-bspwm-dotfiles/.firefoxthemes ~/- Launch Firefox.
- Navigate to Preferences > Home.
- Locate Homepage and new windows, select Custom URLs, and input the target path pointing to your local start page:
file:///home/<YOUR_USERNAME>/.firefoxthemes/startpage/Startpage/index.html - Restart the application to initialize the layout changes.
Keyboard Shortcuts & Desktop Navigation
Tiling window managers optimize productivity by keeping your hands on the home row of your keyboard. The Windows/Super key (super) is configured as the primary modifier key.
Below is the standard reference list of default and custom desktop hotkeys:
| Key Combination | Targeted Event / Action |
|---|---|
| super + Enter | Launches a GPU-accelerated Alacritty terminal instance |
| super + Space | Opens the Rofi application menu to launch GUI tools |
| super + Escape | Reloads sxhkd configuration rules instantly |
| super + Alt + r | Restarts the BSPWM Window Manager |
| super + w | Destroys/closes the active window in focus |
| super + [1-0] | Navigates between workspaces 1 to 10 |
| super + g | Swaps the focused window with the main master frame |
| super + m | Toggles full-screen layout magnification |
| super + [h,j,k,l] | Moves window focus directionally (Left, Down, Up, Right) |
| super + Alt + [h,j,k,l] | Expands the boundary of the focused window outward |
| super + Alt + Shift + [h,j,k,l] | Contracts the boundary of the focused window inward |
| super + s | Toggles floating mode on the selected window |
| super + Ctrl + [Arrow Keys] | Moves a floating window across coordinates |
Conclusion & Professional Retrospective
Rebuilding a desktop environment from modular CLI utilities demonstrates the flexibility and depth of Linux-based systems. Beyond the clean, minimal Nordic design, this BSPWM and Pop!_OS workspace offers significant performance advantages: reduced CPU/memory overhead, absolute control over hotkey mapping, and a highly responsive workspace tailored for advanced software development workflows.
Whether you are a developer, systems administrator, or Linux enthusiast, crafting your own keyboard-driven workspace is a highly rewarding investment in your daily developer experience and operational efficiency.